
🎯 Tạo Toast Notification Cực Chất Với CSS & JS
"Thông báo đẹp thì UX mới 'so deep' được chứ nhỉ?" 😉
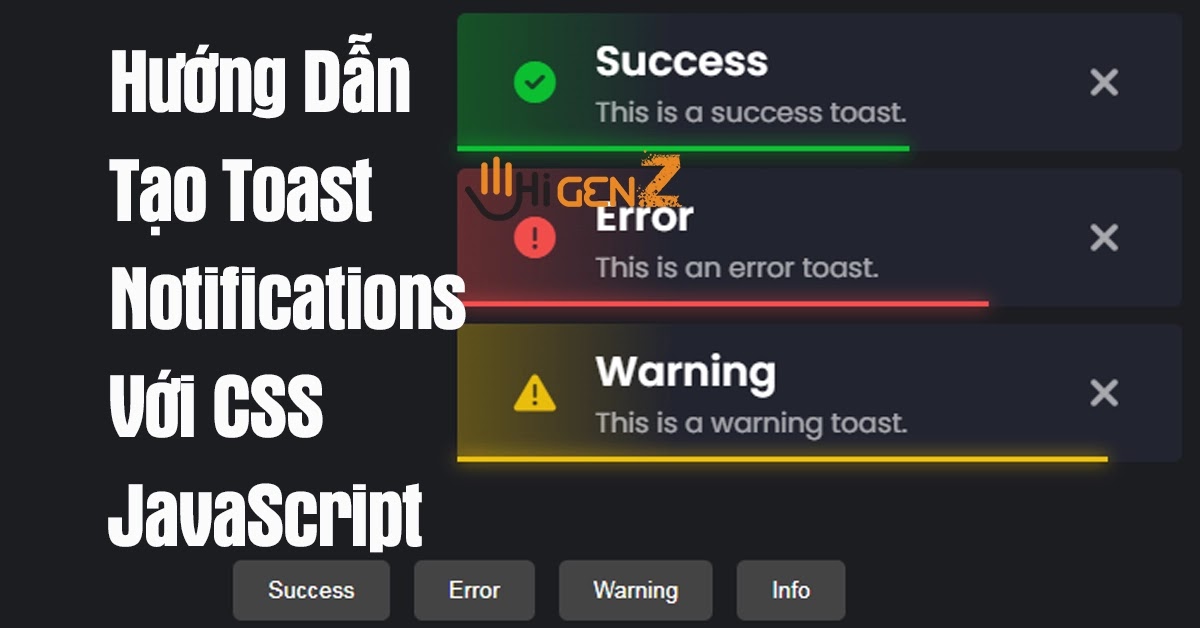
2. Code CSS "Chất Lừ"
Đầu tiên, chúng ta cần style cho các thông báo trông thật "xịn sò":
{css}@import url('https://fonts.googleapis.com/css2?family=Poppins:wght@400;500;600&display=swap'); .notifications { position: fixed; top: 30px; right: 20px; z-index: 1000; display: flex; flex-direction: column; gap: 10px; } .toast { position: relative; padding: 15px; color: #fff; display: grid; grid-template-columns: 50px 1fr 30px; align-items: center; border-radius: 10px; --color: #0abf30; background-image: linear-gradient(to right, #0abf3055, #22242f 30%); box-shadow: 0 4px 20px rgba(0,0,0,0.2); animation: slideIn 0.5s cubic-bezier(0.68, -0.55, 0.27, 1.55) forwards; overflow: hidden; width: 350px; } .toast i { color: var(--color); font-size: 24px; } .toast .title { font-size: 16px; font-weight: 600; } .toast span { font-size: 14px; color: #ddd; } @keyframes slideIn { from { transform: translateX(120%); opacity: 0; } to { transform: translateX(0); opacity: 1; } } .toast::before { position: absolute; bottom: 0; left: 0; background-color: var(--color); width: 100%; height: 4px; content: ''; animation: timeOut 5s linear forwards; } @keyframes timeOut { to { width: 0; } } /* Các loại toast */ .toast.error { --color: #f24d4c; background-image: linear-gradient(to right, #f24d4c55, #22242F 30%); } .toast.warning { --color: #e9bd0c; background-image: linear-gradient(to right, #e9bd0c55, #22242F 30%); } .toast.info { --color: #3498db; background-image: linear-gradient(to right, #3498db55, #22242F 30%); }
Pro tip: Dùng cubic-bezier cho animation để tạo hiệu ứng "bật bẩn" hơn nhé!
3. HTML & JS Siêu Đơn Giản
HTML - Chỉ Cần Thế Này Là Đủ
{html}<div class="notifications"></div> <div class="buttons"> <button id="success">Success</button> <button id="error">Error</button> <button id="warning">Warning</button> <button id="info">Info</button> </div>
JavaScript - Phần "Ma Thuật"
{js}const notifications = document.querySelector('.notifications'); function createToast(type, icon, title, text) { const toast = document.createElement('div'); toast.className = `toast ${type}`; toast.innerHTML = ` <i class="${icon}"></i> <div class="content"> <div class="title">${title}</div> <span>${text}</span> </div> <i class="fa-solid fa-xmark" onclick="this.parentElement.remove()"></i> `; notifications.appendChild(toast); setTimeout(() => toast.remove(), 5000); } // Gắn sự kiện cho các nút document.getElementById('success').addEventListener('click', () => { createToast('success', 'fa-solid fa-circle-check', 'Thành công', 'Thao tác đã được thực hiện thành công!'); }); document.getElementById('error').addEventListener('click', () => { createToast('error', 'fa-solid fa-circle-exclamation', 'Lỗi', 'Oops! Có gì đó không ổn rồi!'); }); document.getElementById('warning').addEventListener('click', () => { createToast('warning', 'fa-solid fa-triangle-exclamation', 'Cảnh báo', 'Bạn chắc chắn muốn làm điều này chứ?'); }); document.getElementById('info').addEventListener('click', () => { createToast('info', 'fa-solid fa-circle-info', 'Thông tin', 'Đây là thông báo mang tính chất tham khảo!'); });
🎉 Kết Luận "Chất Như Nước Cất"
Vậy là chỉ với vài dòng code đơn giản, bạn đã có ngay hệ thống toast notification cực kỳ chuyên nghiệp cho website của mình rồi!
- Thêm icon tuỳ chỉnh
- Đổi màu sắc theo brand của bạn
- Thêm hiệu ứng động phức tạp hơn
- Tích hợp với các framework như React/Vue
Bonus tip: Bạn có thể tuỳ chỉnh thêm bằng cách:
Giờ thì bê nguyên si vào dự án của bạn và "chém gió" với team rằng bạn vừa code cái này từ A-Z nhé! 😎
